Inspector Reference
Every setting on the Breaker component and its built-in trigger companions, grouped by what you do with them. Each section ends with a short "when to change" note instead of just describing the field.
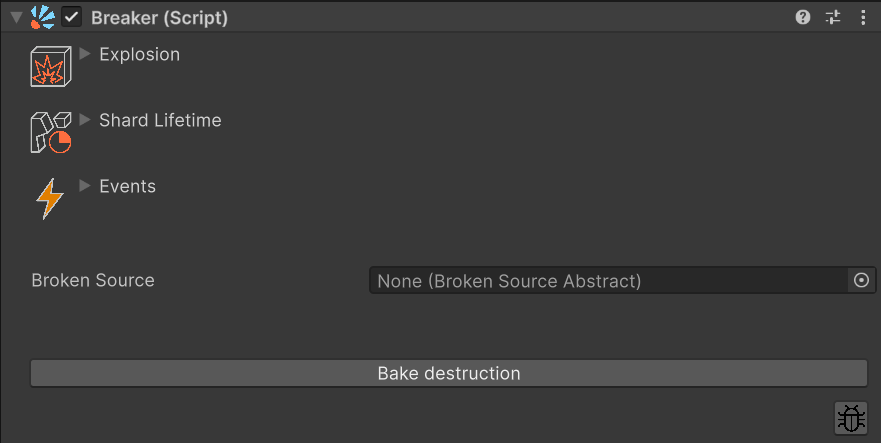
A. Runtime Settings (on the Breaker component)
These control what happens when Break() is called. Tuning them is purely a Play-mode loop — no re-bake needed.
 Explosion
| Field | Default | Notes |
|---|---|---|
Enabled |
true |
Disable for pure-fall debris with no impulse. |
Min Force / Max Force |
200 / 600 |
Per-shard impulse, randomised in this range. |
Explosion Radius |
10 |
How far from the explosion centre the force fades. |
Enable Torque |
true |
Adds angular impulse. Off → shards translate without spinning. |
Torque Min / Torque Max |
50 / 500 |
Random per-shard torque magnitude. |
When to change: tune by trial in Play mode — there's no universal recipe, the right ranges depend on the object's scale and the feel you want. No re-bake needed.
 Shard Lifetime
| Field | Default | Notes |
|---|---|---|
Enabled |
true |
Off → shards stay in the scene indefinitely (no per-shard fade timer, no Shard Lifetime Ended event). You manage them yourself. With a BrokenSourceCollection that has Use pools on, broken objects will never return to the pool in this mode — every Break() instantiates a fresh hierarchy. |
Shards Lifetime Min / Max |
3 / 4 |
Seconds before each shard fades out. Sorted lowest-first. |
Original Object |
Destroy |
What happens to the source GameObject after the break. Destroy removes it permanently. Disable deactivates it but leaves it in the scene so gameplay code can reactivate it later. |
When to change: the feature controls how long shards stay on screen after a break. Turn it off if you want shards to live forever. For the source GameObject, switch Original Object to Disable when you need to reactivate it later (respawn, reset).
 Events
| Field | Notes |
|---|---|
Break Started |
UnityEvent, fires the moment Break() succeeds. Default place for sound, particles, screen shake, loot spawn, score — anything that needs immediate feedback. |
Shard Lifetime Ended |
UnityEvent, fires after the Shard Lifetime feature finishes — i.e. all shards have lived out their random lifetime. Does not fire if Shard Lifetime is disabled. Use only for things that genuinely must wait for the destruction to visually conclude: respawning the source object, opening a gate, cinematic sequencing. |
When to change: wire these up only when something in your game has to react to the break (loot, audio, particles, score, AI signal). Otherwise leave them empty.
Quick no-code audio or particles? Drop a BreakEffect helper on a child GameObject under the Breaker, plug in your AudioSource / ParticleSystem, and wire its Play() here — see F. Break Effect below. For finer control (mixer routing, cross-fades, custom pooling), subscribe to Break Started from your own script instead.
B. Bake Destruction Dialog (opened by "Bake destruction")
The top-level controls of the Bake dialog — the first thing you see when you open it. They decide where the result goes and how many shards it has.
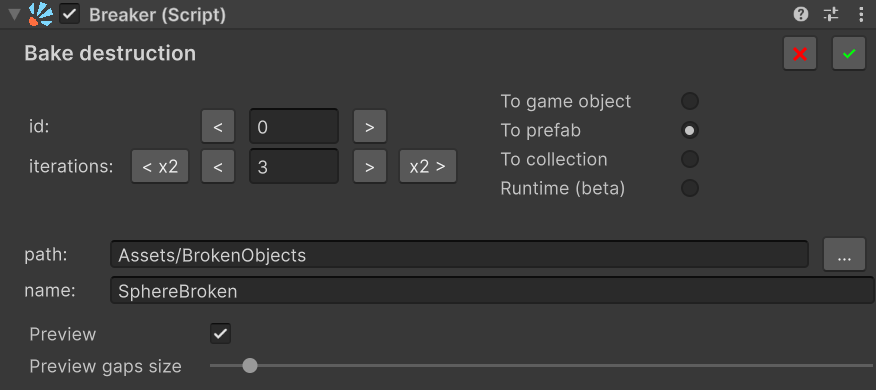
Some fields appear only under certain conditions (noted inline). The fields that always show: id, iterations, Target, Preview.
| Field | Notes |
|---|---|
id |
Variation seed. Two bakes with the same id and iterations produce identical shards. The < / > buttons step through seeds. |
iterations |
Number of slice planes applied. Roughly iterations + 1 shards. More = smaller shards, longer bake. |
Target (radio) |
Where the result is saved: To game object, To prefab, To collection, or Runtime (beta). See the Bake Modes guide for the trade-offs between targets. |
path |
Folder for prefab/collection assets. ... opens a folder picker. (Shown only when Target is To prefab or To collection. Read-only when adding to an existing collection.) |
name |
File name (no extension). (Shown only when Target is To prefab or To collection.) |
Remove previous prefab |
Replaces an existing asset of the same name on re-bake instead of suffixing. (Shown only when re-baking an existing prefab — i.e. after pressing Edit destruction.) |
Preview + Preview gaps size |
Show the result in Scene View before confirming. Cosmetic — does not change the bake. High iterations + preview is the most common cause of editor stutter. |
When to change: raise iterations until the shard count looks right — each cut adds real bake cost, so keep it as low as the look allows. Use the </> buttons next to id to flip through shard variants and pick the one you like — the chosen id is your way to come back to that exact variant later.
C. Destruction Settings (inside the Bake dialog)
These shape the geometry and physics of the shards themselves. Most of them are bake-time — changing them re-bakes the result.
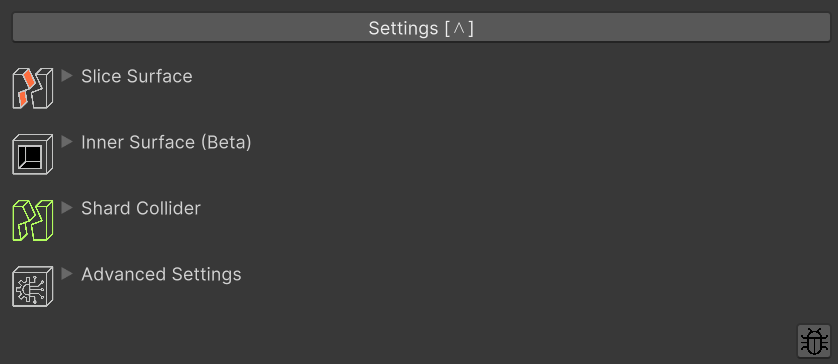
 Slice Surface
The interior face that becomes visible along each cut.
| Field | Default | Notes |
|---|---|---|
Enabled |
true |
Off → cuts are open (no inner faces). If the mesh also doesn't render its interior, the shards look hollow — enable Inner Surface as well. |
Material |
none | Material applied to the cut faces. Leave null and the original mesh's first material is used. |
UV Mode |
FromMesh |
FromMesh keeps the original UVs, Generated projects fresh UVs onto the cut plane. |
Resolve Hole Topology |
true |
Leave it on — closes complex cut loops correctly and is the right default for virtually every mesh. Disable it only in the rare case where the topology pass gets confused by a particularly intricate mesh and leaves unwanted holes in the cut face; the simpler pass avoids those holes. |
When to change: assign a dedicated Material to the cut faces when the outer material doesn't make sense on the inside — stone interior, wood grain end-cut, fruit cross-section, etc. Switch UV Mode to Generated if the inherited UVs come out uneven or stretched on the cut face — see the gallery below.
Visual reference — how the cut faces look under different settings:
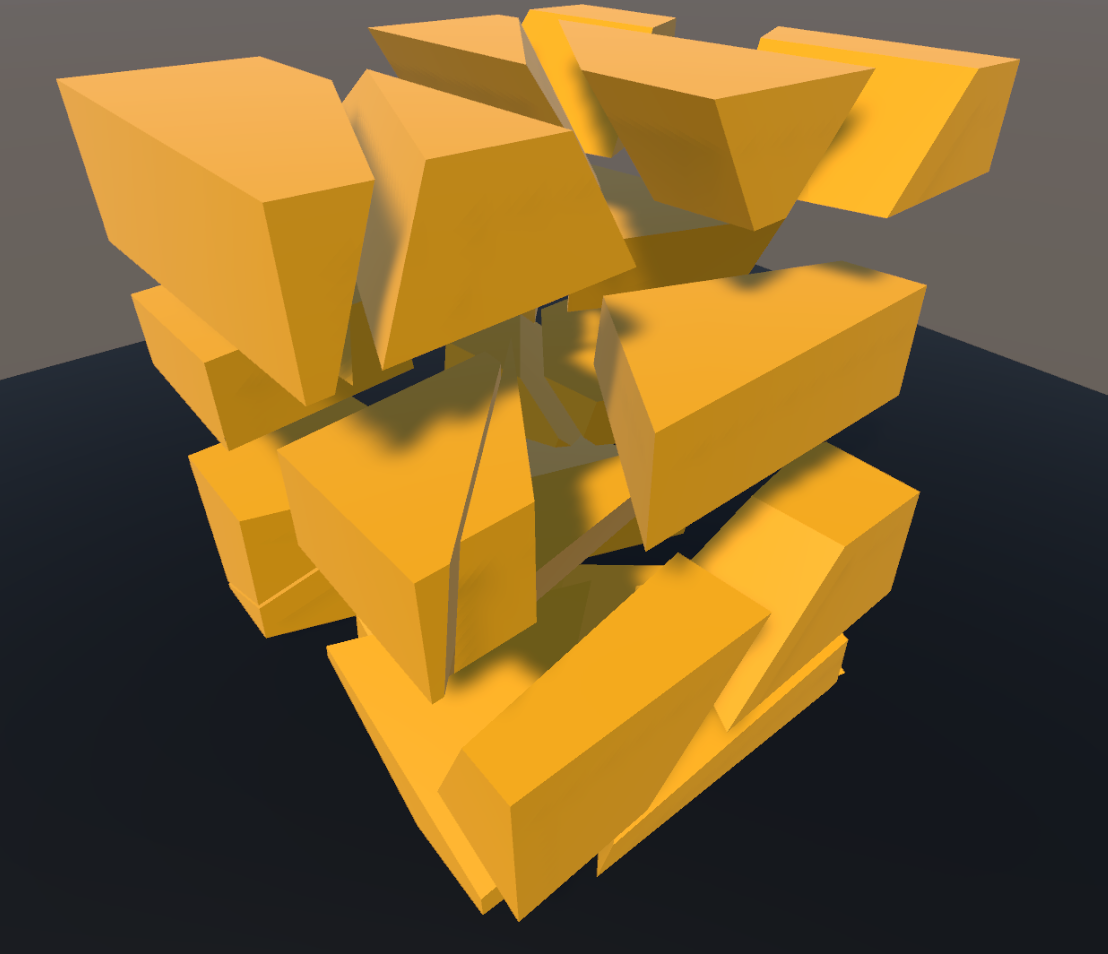
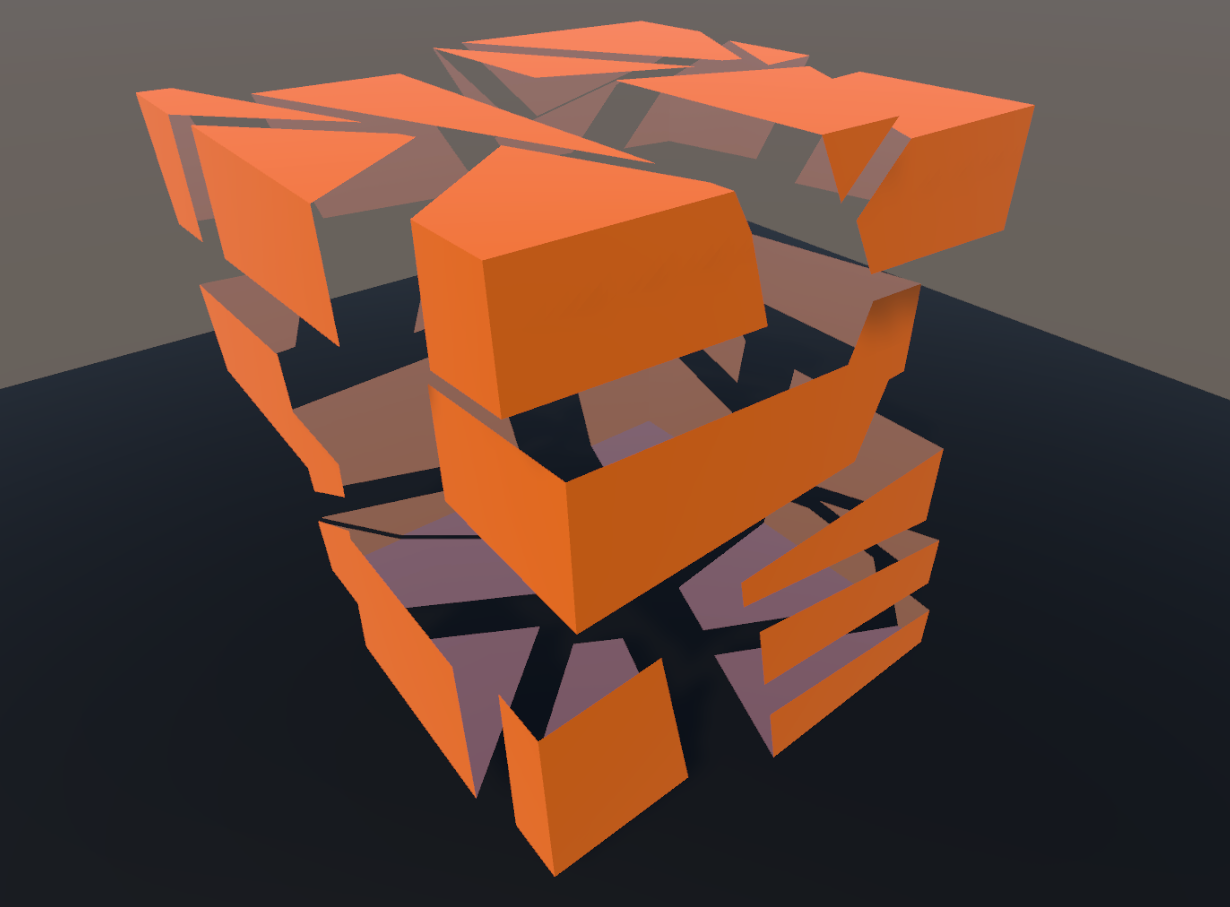
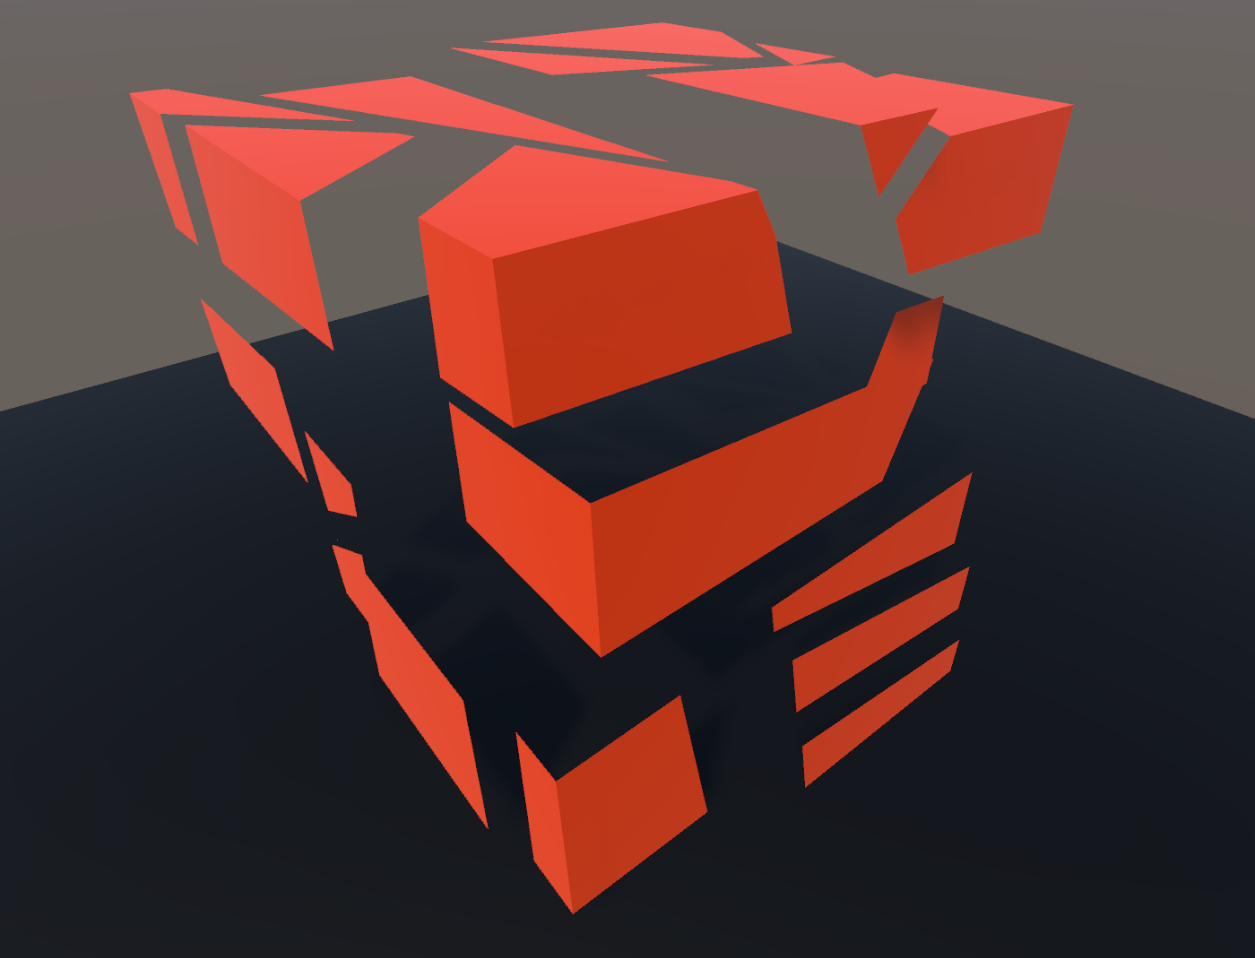
Three states of Slice Surface. Left: Enabled with Material left null — cut faces fall back to the mesh's outer material (same yellow). Middle: off on a double-sided mesh — the cut stays open but the thin walls still render correctly. Right: off on a single-sided mesh — shards look hollow (enable Inner Surface).
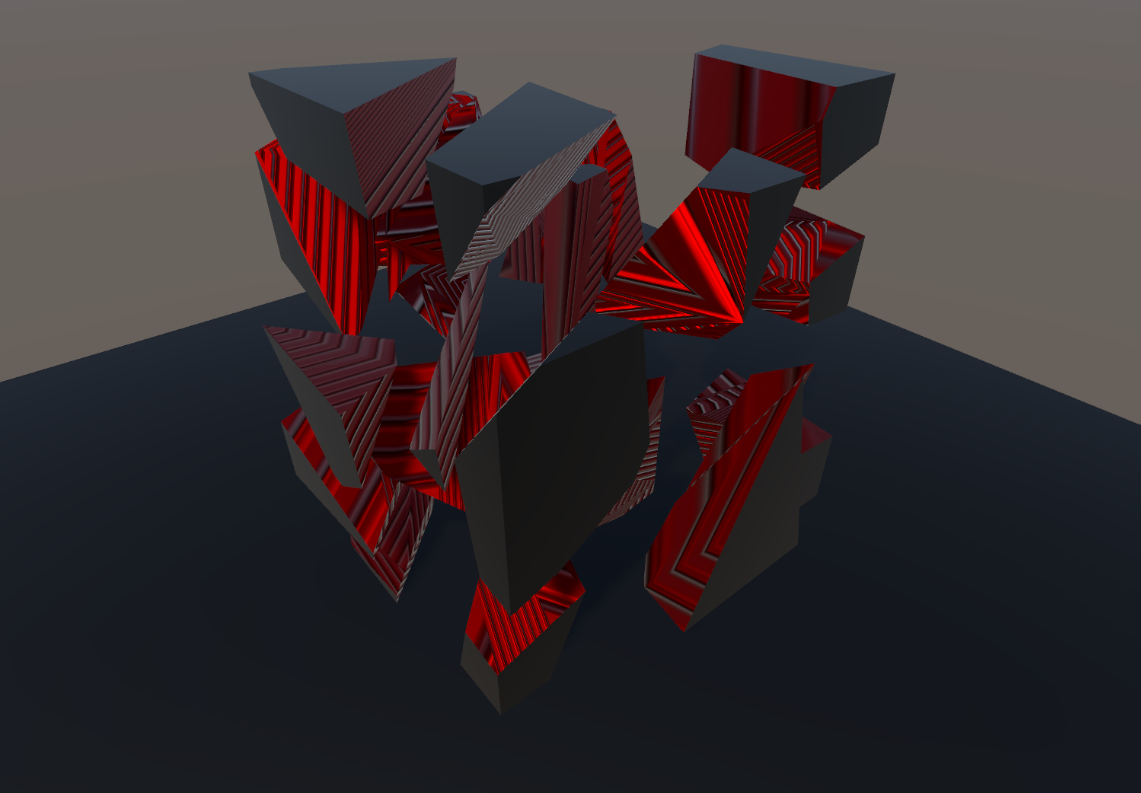
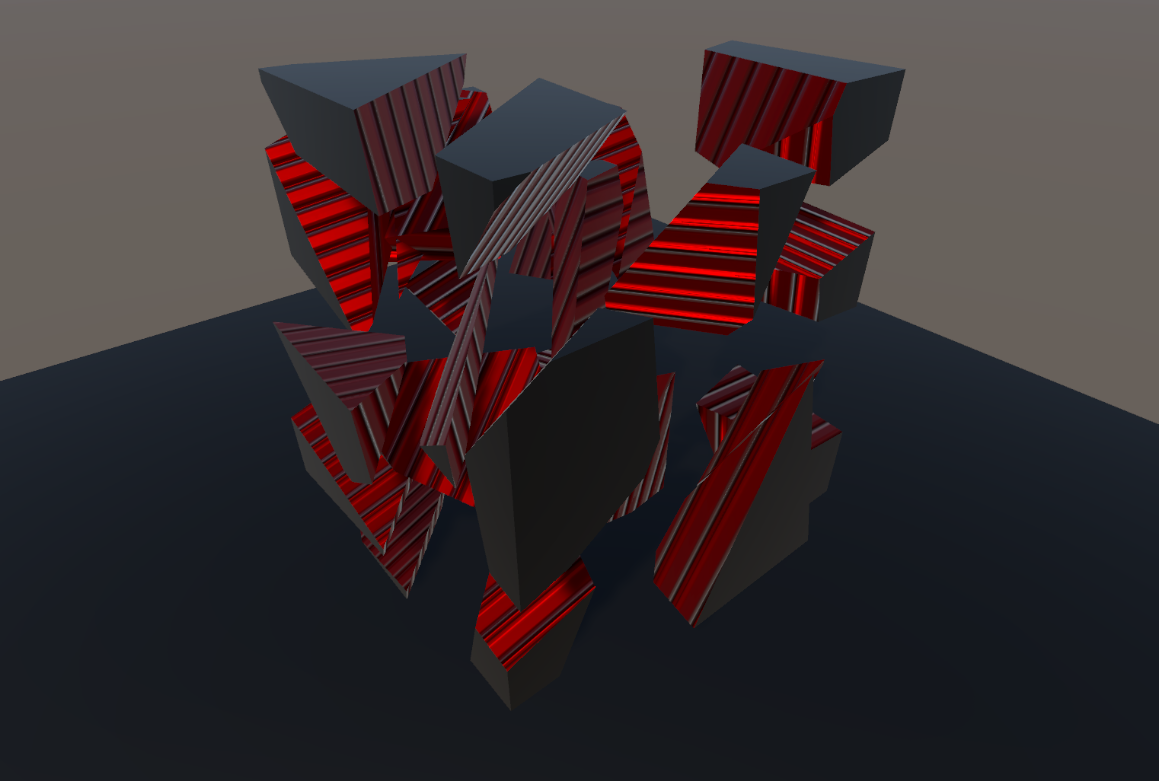
UV Mode. Both shots use a custom interior Material (the red-striped one) so the UV layout reads clearly on the cut. Left: Generated projects fresh UVs onto the cut plane — usually the most uniform-looking result. Right: From Mesh reuses whatever UVs the original mesh has around the cut. It's the default and looks fine on simple shapes, but on complex meshes the inherited UVs can come out uneven or stretched on the cut face — try switching to Generated if the cut faces don't look the way you want.
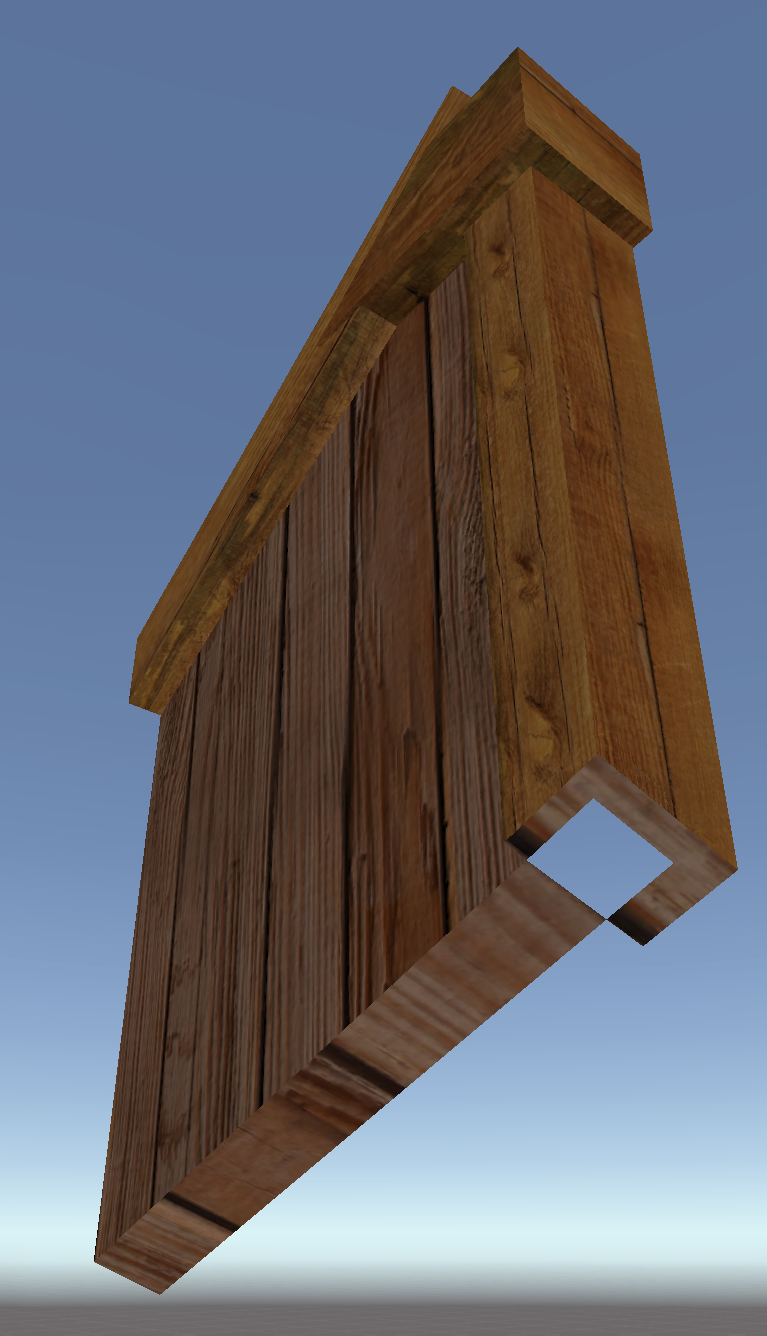
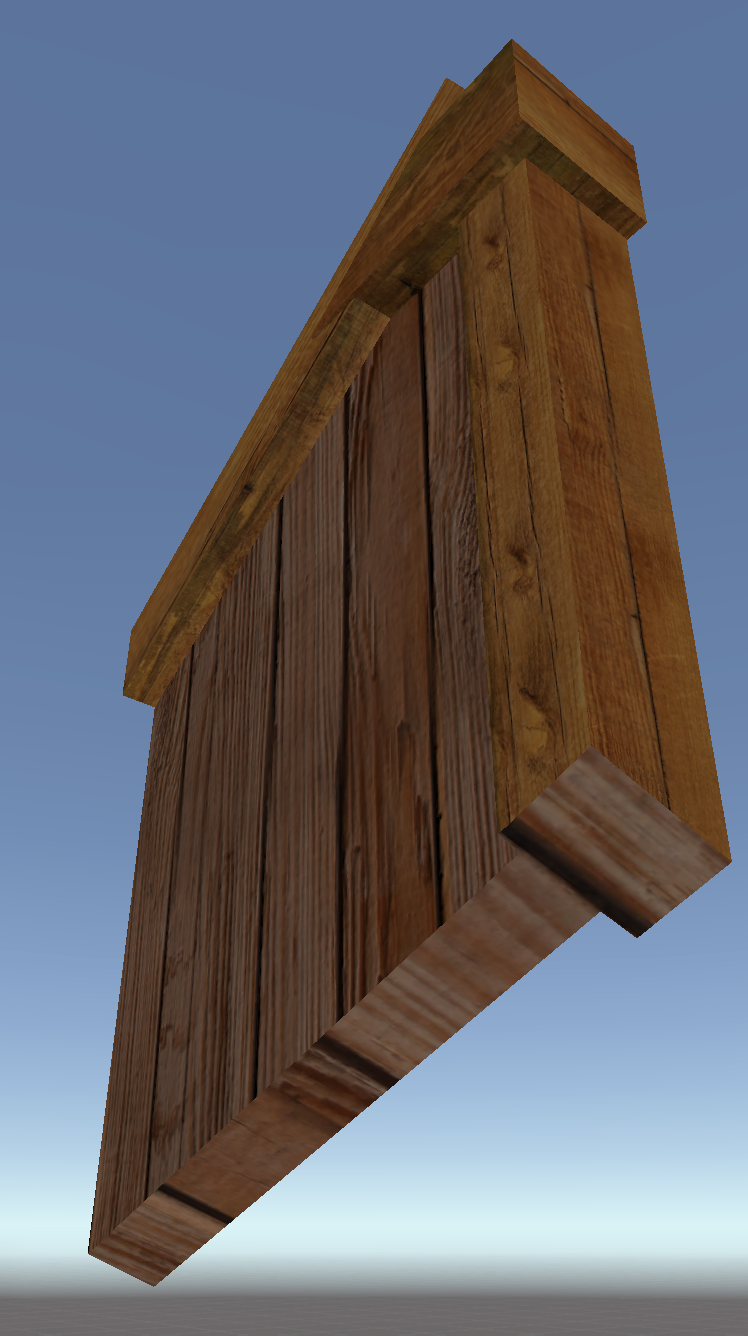
Edge case: on (left) leaves an unwanted hole in the cut face of this intricate mesh; off (right) closes it.
 Inner Surface (beta)
A second, inset surface inside each shard — for hollow-walled effects (boxes, pottery, eggshells).
| Field | Default | Notes |
|---|---|---|
Enabled |
false |
Off by default. Adds significant geometry, enable deliberately. |
Scale |
0.9 |
[0..1]. How far inside the shard the inner face sits. 1 = touching the outer skin (hollow shell). |
Material |
none | Material for the inner face. |
When to change: enable whenever you want hollow shards — the inner face gives walls visible thickness. Keep Scale at 0.8–0.9 for the typical case; Scale = 1 (with Slice Surface off) is the special case for paper-thin shells like pottery or eggshells.
Visual reference:
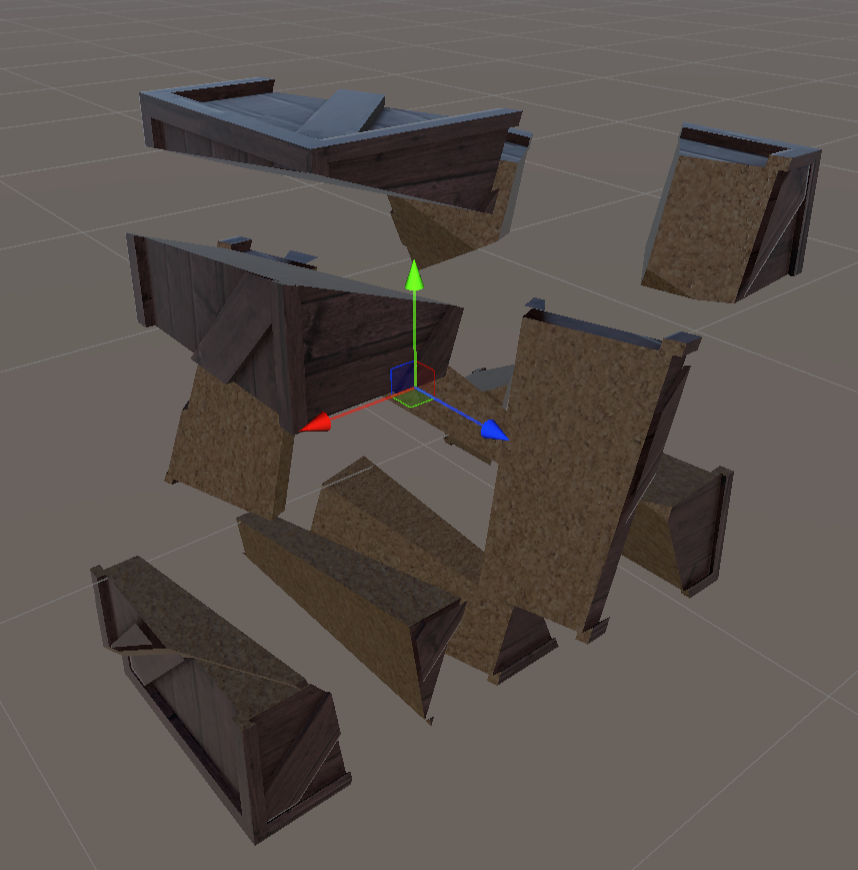
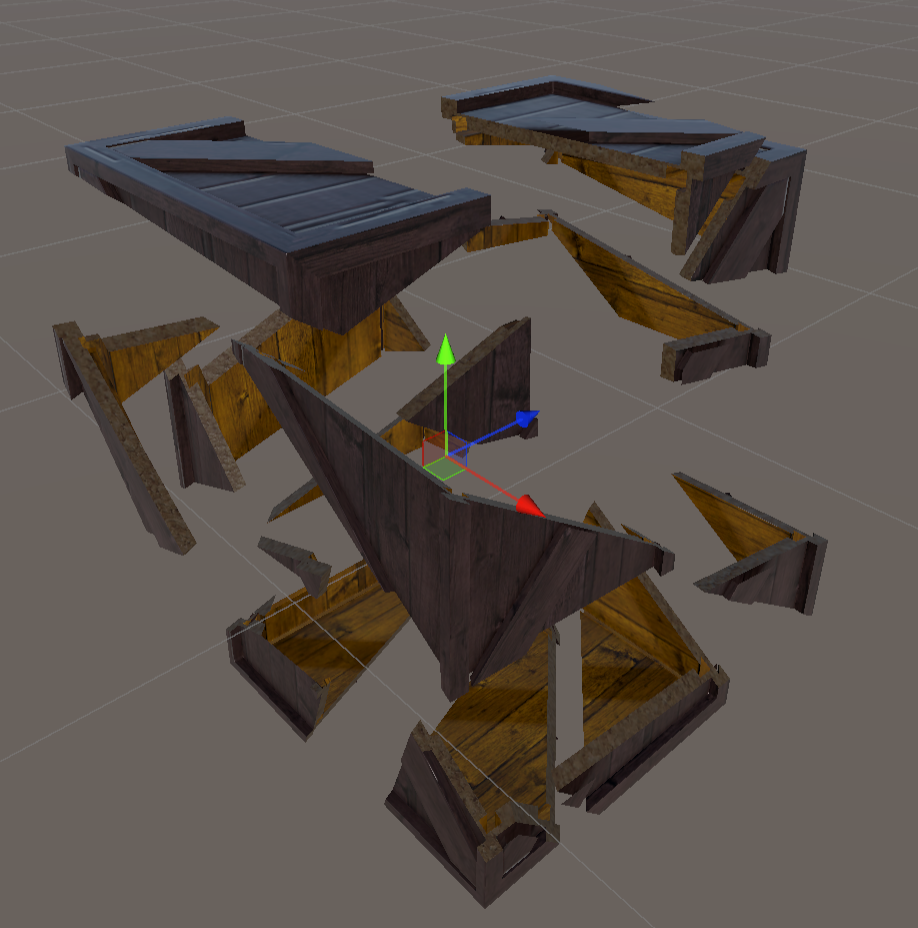
Why Inner Surface matters on a hollow object. Left: off — the crate breaks as if it were a solid block of wood, which reads as wrong for anything box-shaped. Right: on — each shard now has visible wall thickness and a separate inner material; the crate finally looks hollow.

Example configuration that produced the result on the right above: Enabled ✓, Scale = 0.9, dedicated inner Material assigned.
 Shard Collider
Per-shard collider added during bake.
| Field | Default | Notes |
|---|---|---|
Enabled |
true |
Off → no colliders are added to shards. They are visual only and fall through everything. |
Collider Type |
Mesh |
Box, Sphere, or Mesh. All three are convex. |
Trade-offs (all colliders are convex): - Box — axis-aligned bounding box. Cheapest. Fits cube-ish shards well, oversized for elongated or angular ones. - Sphere — bounding sphere. Cheap and stable; the loosest visual fit of the three. - Mesh — convex hull of the shard mesh. Closest visual fit; most expensive of the three.
When to change: start with Mesh for a tight visual fit. Switch to Box or Sphere if physics cost matters (mobile, many simultaneous shards). Disable the whole feature if you want shards to pass through everything (e.g. cosmetic-only shatter for a cinematic).
 Advanced
Algorithm tweaks plus the Unity Layer/Tag applied to every generated shard. The algorithm fields are highly mesh-dependent — most projects never touch them; Layer/Tag are useful even on an otherwise default bake.
| Field | Default | Notes |
|---|---|---|
Precision Digits |
algorithm default | Decimal precision used internally. When shards come out with missing fragments or visible gaps, try raising and lowering it — either direction can help depending on the mesh's scale and topology. |
Use Custom Clusterization Epsilon |
false |
Turn on to override the default vertex-clustering threshold with your own value. |
Custom Clusterization Epsilon |
algorithm default | Vertex-clustering tolerance. Smaller → tighter (more shards, more cost); larger → coarser (can resolve gaps and stray triangles). Like Precision Digits, calibrate by feel — try both directions when artefacts appear. |
Merge Meshes Before Slicing |
false |
Enable for composite objects where several child meshes should slice as one continuous surface — e.g. a crate assembled from separate plank meshes. |
Split Islands Before Slicing |
true |
Leave on by default. One-time pre-pass that separates the source mesh's disconnected pieces into independent shards before slicing starts — useful when a single GameObject's mesh already contains several disjoint islands. |
Split Islands Every Slice |
false |
Enable when a slice can visually separate the source into parts you want as distinct shards. Classic example: a horizontal cut on a stool — off, the four sliced-off legs stay as one shard; on, each leg becomes its own. See the gallery below. |
Chaotic Slicing |
false |
Turn on for natural-looking breakage on wood, stone or plaster — anything where even bisection looks artificial. Pairs well with To collection mode for extra variety per break. |
Layer Mode |
Inherit |
Inherit — shards copy the Breaker GameObject's layer. Custom — every shard gets the layer picked below. |
Layer |
— | Active only when Layer Mode = Custom. Most useful for routing shards through the Physics collision matrix — give shards their own layer, then in Project Settings → Physics uncheck that layer against itself and against the player to keep shards from interfering with gameplay or piling into each other. |
Tag Mode |
Untagged |
Untagged — leaves the standard Unity default. Inherit — shards copy the Breaker GameObject's tag. Custom — every shard gets the tag picked below. |
Tag |
— | Active only when Tag Mode = Custom. Useful when gameplay code needs to recognise shard collisions specifically — an OnCollisionEnter handler can check the tag to react only to debris (e.g. trigger a sound only when a shard hits a surface, not when the player does). |
Visual reference:
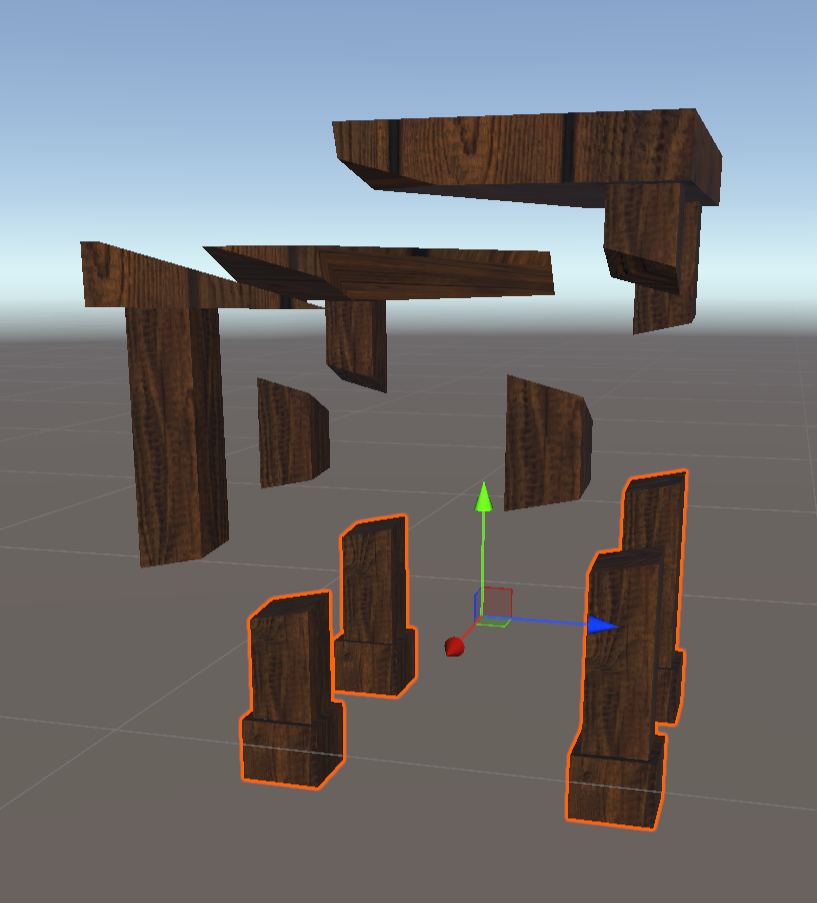
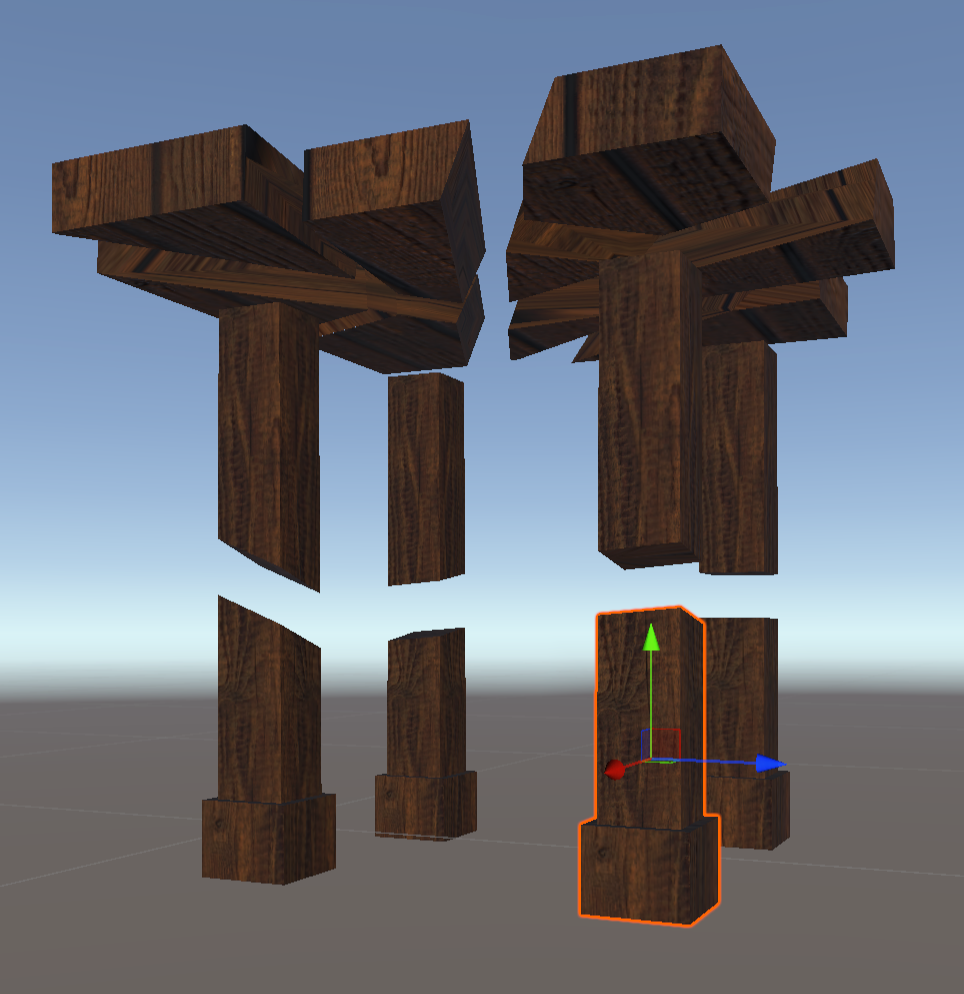
A horizontal cut on a stool. Left (Split Islands Every Slice off): all four sliced-off legs stay glued as one shard — selecting it highlights every leg at once. Right (on): each leg becomes its own shard, so selecting one outlines only that leg.
 D. Debug Settings
| Field | Notes |
|---|---|
Logging Enabled |
Verbose per-step timing and per-shard diagnostics from the slicing pipeline. Note: turning it off also silences pipeline-internal warnings and errors; top-level Breaker errors always log. |
Show Hidden Game Objects |
Reveals internal helper objects inside the broken hierarchy. |
Slice Observer |
Optional component to step through the slicing algorithm visually. Development aid. |
When to use: only when something looks wrong. Off in production.
E. Trigger components
Add alongside Breaker for no-code triggers.
BreakByClick
| Field | Notes |
|---|---|
Breakers |
Array of Breakers to call Break() on when the object is clicked. Usually one, but you can fan out clicks to several. The object needs a Collider. |
BreakByCollision
| Field | Notes |
|---|---|
Breakers |
Array of Breakers to call Break() on impact. |
Tags |
Optional. If empty, any collision triggers the break. If populated, only contacts with objects having one of these tags qualify. |
The contact point of the first collision becomes the explosion origin, so impulses radiate outwards from where the hit landed. The moving object needs a Collider and Rigidbody; the breakable needs a Collider.
F. Break Effect — quick particles & sound on a break
A small helper component, BreakEffect, for no-code sound and particles on a break. Put it on a child GameObject under the Breaker — not on the Breaker itself, or SetActive(false) disables both at once and the effect cuts off mid-flight (OnValidate warns if you get this wrong). Assign your AudioSources / ParticleSystems, then wire its Play() to Break Started. On Play() it reparents itself so the effect survives the break and self-destroys once playback finishes.
It's a convenience for simple cases. Need mixer routing, layered audio, cross-fades or custom pooling? Skip it and subscribe to Break Started from your own script (see Scenario 3). Ships in CyberRevolution.BOSS.Scripts.Breakable.
BreakEffect
| Field | Default | Notes |
|---|---|---|
Particle Systems |
— | Array of ParticleSystem to play on Play(). |
Audio Sources |
— | Array of AudioSource to play on Play(). |
Destroy After Finish |
true |
Off → the helper GameObject stays after playback. |
Destroy Delay Extra |
0.5 |
Extra seconds added to the longest source duration. Buffer for trails, reverb tails, sub-emitters. |
If any assigned AudioSource has Loop = true, the helper logs a warning and skips auto-destroy — turn off the loop, or disable Destroy After Finish and manage it yourself.
Setup: child under the Breaker → add ParticleSystem and/or AudioSource → add BreakEffect → assign them to its arrays → on the Breaker, wire Break Started → BreakEffect.Play(). Full walkthrough in the Scenarios guide.
G. Source components
Three small components hold the baked destruction data — exactly which one ends up on the Breaker GameObject depends on the Target you picked in the Bake dialog. The bake flow adds the right one for you; you normally don't add them by hand. This section documents the fields so they're visible in the reference.
The Breaker tracks the active one through its Broken Source field. Switching between sources is done by Clear destruction + a new bake — they cannot be swapped in place.
BrokenSourcePrefab
Created by bakes with Target = To prefab.
| Field | Notes |
|---|---|
Prefab |
Reference to the baked broken-object prefab. Replace it manually to point this Breaker at a different bake without re-baking. |
Each Break() instantiates a fresh copy of the prefab; the broken instance is destroyed when its shards' lifetime ends.
BrokenSourceGameObject
Created by bakes with Target = To game object.
| Field | Notes |
|---|---|
Baked Broken Object |
Reference to the disabled broken hierarchy living as a child of the Breaker in the scene. |
The baked hierarchy is a scene object (no asset on disk), used once: after Break() it is destroyed. This source does not support reuse — for that, bake to a Prefab or Collection instead.
BrokenSourceCollection
Created by bakes with Target = To collection.
| Field | Notes |
|---|---|
Collection |
The BrokenObjectCollection asset containing the baked variations. Each Break() picks one at random. |
Use pools |
Off (default): every Break() does Instantiate and Destroy. On: shards are reused from a pool — recommended for high-frequency destruction. See Pooling notes below. |
Pooling notes:
- No scene setup needed.
BrokenObjectPoolsis created automatically on the firstBreak()and lives as long as the active scene. Do not add it to the scene by hand; switching scenes drops the pool with the old scene. - Prewarm from code if the first break should not pay the
Instantiatecost:BrokenObjectPools.EnsureInstance().PrewarmForCollection(collection, count);countis the number of pre-built instances per prefab in the collection — a collection of 3 variations withcount = 5produces 15 ready instances. - Gotcha: with
Shard Lifetime → Enabled = false, broken objects never return to the pool — everyBreak()instantiates a fresh hierarchy. This is the necessary trade-off of "shards stay forever".
When to change: turn Use pools on for high-frequency destruction (mass shatters, repeated breaks of the same collection in a level). For one-off scenes the default off is fine — no allocations to keep, no extra GameObject in the hierarchy.